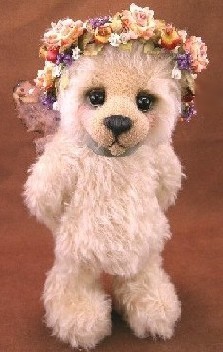
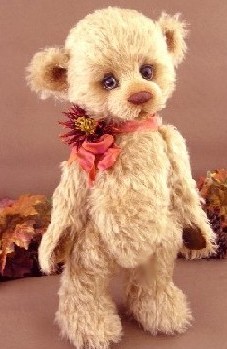
While it takes a great and wonderful teddy bear to form the foundation of a superb photograph, it’s not the physical, in-the-flesh bear itself, but
rather, your photograph of that bear – that promise of sweetness, snuggle ability and furry warmth - which ultimately sells your bear in an online or print format environment
I use the word “sell’ somewhat loosely here. If you are submitting your photographs for publication in a magazine or a competition, your photographs also "sell" your bear to editors or judges.
That’s a pretty strong argument in favor of learning at least the minimum basics of digital photography.
We, as bear artists, spend a passionate, focused, near-eternity producing each furry, winsome bruin and we fervently hope each of them will emanate
beauty and softness, and exude lots of texture, color and personality.
Empathy
Collectors, editors, and judges must see, know and feel that plethora of sensations before they will commit their prizes to your hands; offer your
teddy precious space in their feature articles, galleries, or cover stories; or grant your work a coveted spot on their yearly nominee lists.
The bottom line for the bear maker seeking an audience, is this: the ONLY way you can give your audience visceral, emotional, textural experience within the detached, two-dimensional nature of the Internet, e-mail or print digitized environment, is through your photographs.
First Impressions Count
If your photographs are blurry, washed out, too dark, off center, show little or no visible detail, have been “flattened” by the use of a camera-mounted flash, are poorly color balanced, and/or showcase a tiny, messy bear on a huge wrinkled background, you will not convey these absolute necessities: mastery of techniques and media; originality; exquisite sense of color and proportion; and attention to detail.
Even worse, with bad photography at the foundation of your presentation, the emotion you’re most likely to evoke in your audience won’t be a reverent,
“Beautiful!” or a passionate, “I simply MUST have that cub!” but rather, a frustrated, “Geez… I wish I could SEE that bear in person!”
I’m guessing the latter expression is probably NOT your goal.
Success As a Mind-set
If, instead, your goal is to use the internet or print media to find new homes or showcases for your gorgeous cubs, at a price or exposure level equal
with your talent, experience, effort, creativity and materials costs, then please consider spending time on the development of your photography skill set.
Novice
But first, a big (and maybe surprising?) disclaimer here: I actually don’t know that much about photography per se, as those of you more experienced in the field will quickly surmise.
Sure, I’ve skimmed a few books and read a few how-to articles. But I have no formal training or class work and couldn’t tell you about F-stops, light meters, shutter speeds, or film development to save my life.
Still, even without such knowledge to call upon, I get compliments on my teddy bear photography all the time. Why?
Essentials
Probably because I took the time to learn the basics and my photos are:
- finely detailed and sharply in focus (camera);
- well and purposefully lit (lighting);
- carefully cropped to showcase what I want them
to showcase (editing); and
- feature teddy bears that have been styled and arranged for their photo session with the utmost
of care (styling.)
Your photographs can be these things, too, if you just pay attention to a few simple, but critical, details.
BUYING A CAMERA
There is a dizzying array of camera options from which to choose, at a variety of price points.
Your job, BEFORE you shop, is to determine for yourself:
(1)
all the scenarios in which your new camera will be used; and
(2) how much you can afford to spend.
Beyond that, and at the very simplest level, there are
only a few, very important, considerations to remember
as you shop:
- You don’t need a 25 mega pixel camera if you are only going to
post photos to a digital scrapbook or web site at a resolution of 72 dpi.
However, if you want to print 8"x10" photos with very fine, crisp detail, get a camera with the biggest mega pixel number you can afford.
Plain and simple, the more mega pixels your camera has, the bigger (meaning containing more pixels, or little squares of digital information) your image can be, and the bigger you can print your pictures, while retaining excellent photo quality (“resolution,”or fineness of detail).
- “Digital Zoom” is a mostly useless feature; ignore it as you shop.
Anything your camera can do using “digital zoom” you can do yourself, using even the most primitive photo editing software, back at home. Digital zoom is basically the same thing as taking a digital photograph, cropping it using photo editing software, and then enlarging the cropped portion.
- “Optical Zoom” may be an important consideration
in your selection process. Optical Zoom is expressed as 3x or 2x, etc., and these numbers tell you how many “times” closer (or farther away, depending on your starting point) you
can zoom to/from your subject. Imagine your product and photo studio setup (Is your tripod going to be two or ten feet from your bear during a photo shoot? Are you photographing large or miniature bears? Singly, or in large groupings?) and make your decision on Optical Zoom needs based on those parameters.
- If you make minis or have the need to shoot close detail, you'll
need a Macro feature.
Macro functioning allows you to grab super close-up shots of tiny bears or small features (like the custom-painted eyes you spent two hours perfecting), without the usual distortion
or blur you would normally get if you did not use such a tool.
- Automatic functioning in any camera, digital or otherwise,
is a blessing for someone like me who otherwise couldn’t shoot an action or scenery shot to save her life.
While automatic functioning is my choice for everyday photographs, however, I always use my camera’s manual functioning or program feature for teddy bear photography.
This allows me, as the photographer, to set many camera performance parameters myself, such as: whether or not to use flash, the type of lighting being used, White Balance settings, etc.
If you want to have any degree of control at all over the pictures you take, you’ll need a camera that lets YOU choose how, when, and if, specificfeatures and functions will operate. Some cameras will even allow you to choose SOME functions while leaving the camera to choose the rest, in a “sorta-kinda-semi-automatic” mode. It’s not as scary as it sounds.
- Consider storage media options carefully. Back up your photos
to a CD or DVD for security. Do not keep your valuable photo only
on the hard drive.
On the other hand, many cameras utilize “card” devices for storage. These cards are tiny and extremely portable.
The question then becomes whether you want to regularly download photos to your computer, then delete those photos from your memory card, so you can re-use your Flash memory card for the next round of pictures.
- Be sure the camera you choose lets you select lighting conditions
(fluorescent, incandescent, outdoor, indoor, etc.) and manually set white balance.
I find these features absolutely indispensable to good still life and portrait photographs.
Before every photo shoot, I (a) make sure the appropriate light source is selected (in my case, I use fluorescent bulbs; my camera has THREE possible fluorescent settings. I pick the correct one for my bulb type,) and (b) reset my white balance for current conditions.
Both of these actions help avoid the awful, greenish, yellowish, otherworldly cast that could otherwise result since I use fluorescent lighting.
Quick Tip
To set white balance, focus on something you know is white (like a scrap of fabric tossed next to your teddy), and then <click> a button to measure and set white balance for that photo shoot. Beautiful pictures, with true colors and pure white tones, await you! |
Your local bookstore or favorite camera store will also be happy to further assist you in finding the “perfect” digital camera for your needs. I will leave the remaining technical and functional explanations to these experts, who are admittedly far wiser and more experienced than myself.
You’ll also find ample resources online, Google your questions and see what pops up.
Page 2 Page 3 Page 4 |

 3428 Hillvale Road