Photographing Teddy
Part One - Page 2
Lighting Your Shots
On occasion you might serendipitous encounter the perfect photography day - warm and bright, but also partly cloudy or hazy - impeccably suited for excellent outdoor photographs due to the naturally diffused softness of overhead light bouncing around everywhere. However, you cannot count on perfect weather to enable your photography.
That is why I can’t emphasize strongly enough the importance of using a LIGHT TENT or LIGHT BOX.
For the amateur photographer, this is a reliable lighting solution both in terms of cost and user-friendliness.
A light tent softly diffuses artificial lighting, bouncing light around your subject to eliminate harsh shadows and illuminate every tuft of fur, wispy ear edge or sparkling eye highlight, in a most pleasing and professional way.
Hand Made
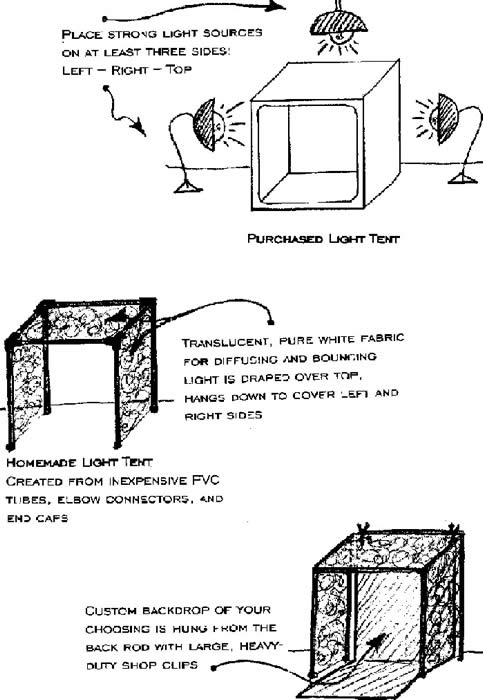
You can buy a light tent, or you can easily make your own, using PVC pipes, a few plastic elbow connectors and end caps, and a length of translucent PURE WHITE fabric (other colors will throw unwanted color casts onto your subject.) Most home improvement stores will cut your PVC to size, free, at the time of purchase, so when you shop, bring your desired light box dimensions with you.
Sketch of a Light Tent You Can Make Yourself
Variables
The dimensions of your tent will be determined by the size
of your bears, and by the amount you want to shoot at one
time.
Space constraints in your home will also be a consideration. Let your own particular needs dictate your ultimate design.
Considerations
This brings me to the issue of the lights themselves.
I could speak endlessly about cost per bulb, life expectancy of certain bulb types, and personal preferences.
In the end, though, it doesn’t really matter how you light
your shots, as long as you set your camera to correspond with your lighting choice and provide PLENTY of light.
Remember: In the search for color-true photographs where white balance is set and used as your baseline, “white” will never really be “white” if you don't hit it with enough light.
More is Not Enough!
So, pour those lights on! Get things so bright that you
can hardly stand it; so bright that, even if you’re using
fluorescent bulbs – which I use exclusively – you’re beading up with sweat after two minutes.
That is how much light you need to take a showcase quality photograph.
Think about the sweltering lights of a “portrait sitting” or
“movie set” and you’ll understand what I mean.
It may help you to learn that I use a total of fourteen,
four-foot fluorescent tubes AND a clip-on halogen “hair light” (for highlight) in my photo studio. I think I should probably add several more.
One last point: Even in dark
conditions, don’t use your flash.
Your flash will tend to “flatten” your subject, removing any sense of three-dimensionality, and usually casts harsh and unflattering shadows in the process.
When it comes to flash photography, unless you really know what you’re doing, just… don’t… do it.
Page 1 Page 2 Page 3 Page 4 |

 3428 Hillvale Road