Photographing Teddy
Part One - Page 4
The End Result
So, what can you expect in return for your investment of time and energy?
You can expect to take your photographs from “Ho-hum” to “Holy cow!” … as these eight photos of my bear, LOVEY, will hopefully illustrate.
Each picture looks dramatically different from the next, but
bear pose and camera position (I used a tripod) were held
steady throughout, and only the conditions, as noted, were manipulated.
No light was provided at all. Camera was set to AUTOMATIC, which forced use of the FLASH. This bear looks startled and scary, instead of like the cute little cub it actually is. |
 |
Ceiling fixture, single-bulb light was rovided. Camera was set to AUTOMATIC, which forced use of the
FLASH. There’s just not enough light available to shoot this teddy bear
well. |
 |
Fluorescent tube lights were used for illumination. Camera was set to AUTOMATIC, which didn’t allow “Fluorescent”
or “White Balance” settings to function, causing an odd greenish color cast. Teddy looks sea-sick and the picture is unappealing. |
 |
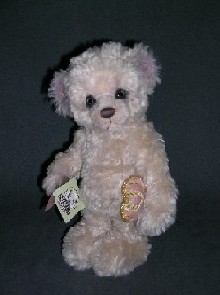
Fluorescent tube lights were used for illumination. Camera set to PROGRAM and “Fluorescent-Type 1” selected for lighting type (parameters
for my specific camera.) WHITE BALANCE measured
for existing conditions. These steps eliminated the odd color cast and produced whiter whites…but the photo is still a bit dark. Probably because
I am shooting against a dark matte, textured background which sucks up a lot of available light. The picture is good enough to take to my computer, though, so my photo session ends here. |
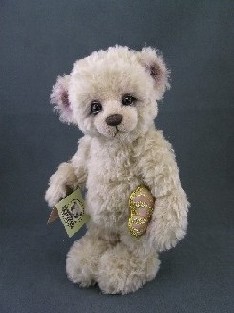 |
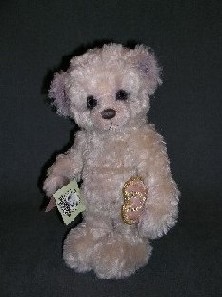
Photo has been downloaded and, using PhotoShop, edited for BRIGHTNESS and CONTRAST. |
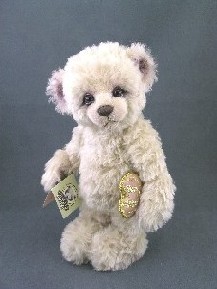 |
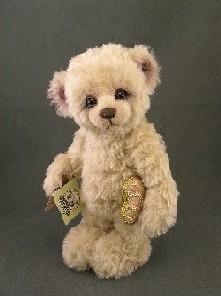
Photo has been edited further for LEVELS (similar to B&C)
and to adjust HUE and SATURATION so that the colors represented in my photo more closely match the colors of my actual bear, which is heavily shaded at ears and muzzle in tones of purple and pink. I hold
the bear right next to my monitor when adjusting colors for the truest match. |
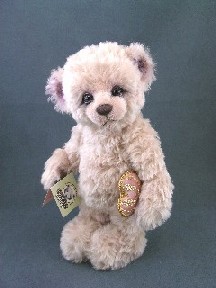 |
Photo has been cropped to better focus the eye on the bear itself. |
 |
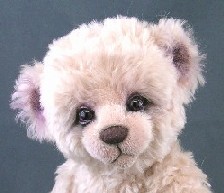
Photo has been tightly cropped to highlight the colors and details in the face. |
 |
Some Final Thoughts Worth Remembering:
 If you take a lot of pictures, it’s extremely useful to keep a spare battery for your camera, with a charger plugged in, recharging that spare at all times, so that you’re always ready to go. Count on roughly $30 – 50 additional expense for this much-advised, luxury add-on. If you take a lot of pictures, it’s extremely useful to keep a spare battery for your camera, with a charger plugged in, recharging that spare at all times, so that you’re always ready to go. Count on roughly $30 – 50 additional expense for this much-advised, luxury add-on.
 The best digital photographs in the world will look discolored, fuzzy and terrible on a low quality or poorly calibrated computer monitor. Make sure your monitor is in good shape and broadcasting true colors before passing judgment on photo quality or photography skill set. The best digital photographs in the world will look discolored, fuzzy and terrible on a low quality or poorly calibrated computer monitor. Make sure your monitor is in good shape and broadcasting true colors before passing judgment on photo quality or photography skill set.
 Generally, teddy bears photograph best when set against backdrops that contrast with their coloring. For example, a cream colored bear looks best photographed on a dark (maybe purple or indigo) backdrop. Generally, teddy bears photograph best when set against backdrops that contrast with their coloring. For example, a cream colored bear looks best photographed on a dark (maybe purple or indigo) backdrop.
This theory falls apart a little bit when it comes to photographing VERY DARK bears, which are extremely difficult to photograph well.
In the case of very dark bears, I find that a mid-tone – rather than starkly contrasting, opposite-colored backdrop, usually in a very unrelated color (dark brown bear on bright blue backdrop; black skunk on red backdrop), works the best. Do consider using extra lighting when photographing very dark critters, so that you can bring out the texture of their fur and detailing as much as possible.
Credits
When I first started bear making around early 2004, much
of my earliest photography know-how came from a most
surprising and particularly gracious and helpful mentor -
and now, good friend – bear artist, Michelle Lamb. Credit,
and then some, is due her for cheerfully sharing tips and
pointers on bulb use, light tents, indoor versus outdoor
photography, grooming and styling of bears, and how
to avoid the dreaded “hot spot.” Thank you, Michelle.
Page 1 Page 2 Page 3 Page 4 |

 3428 Hillvale Road