|
Photographing Teddy
Part One - Page 3
EDITING YOUR PHOTOGRAPHS
Bear makers of integrity seem to universally share a truth in advertising approach to their bears; one which I readily embrace. I edit my photographs as little as possible -- or even better, not at all -- in terms of adjusting the features on the bear, itself.
For example, I would never clone stamp a tuft of fur where it doesn't actually exist; I don’t remove or adjust seam lines or smooth out weird curl patterns with a healing tool; nor do I alter features like eyes or noses by recoloring, reshaping, or blurring them digitally for a more precise or “perfect” effect.
I rarely make an exception to this rule unless, for example, there is a truly wild and errant hair sticking out of Mr. Bear’s head that detracts significantly from the overall photo quality and presentation, but is barely noticeable in real life.
I do, however, fully utilize the capabilities of my photo editing software (in my case, Adobe PhotoShop 7.0) to crop, brighten, adjust contrast and color correct.
Cropping
Ask yourself what you are selling. Two yards of wrinkled
backdrop, or a beautifully made teddy bear? If your answer is “a beautifully made teddy bear,” then make sure your photo is focused on that beautiful bear… not on a wrinkled backdrop.
A well-cropped photo draws the viewer’s eye to the important features while removing extraneous visual information that would otherwise detract from the impact of your subject and photograph.
The best rule of thumb on “what to crop” from a photo is: if it doesn’t add to the picture, it subtracts from it. Get rid of it.
Case in point…
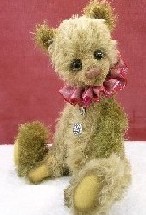
- Left - A nice shot of one of my bears, SWEETIE.
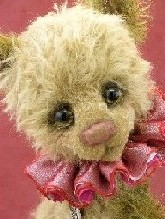
- Middle - The same picture, cropped to showcase facial detailing.
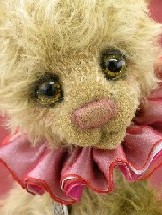
- Right - Here’s the best shot, cropped very close.
This last shot really shows off SWEETIE’s baby face; layeredneck ruff; custom painted eyes; and careful nose embroidery with shaded accents; all of which I wanted to highlight in my photograph.
Note that it’s not always important to have a border of “background” or “space” framing the outer edges of your subject, or to present your subject in its entirety!
SWEETIE is cropped so close here that she appears to exist without ears, limbs, or torso! Don't worry. The discerning collector or editor will deduce that she has a body, too, somewhere out of sight.
Still, when using a tightly cropped shot in your auctions,
on your website, or in photo submissions, DO be sure
to include at least one full body photo to represent your
teddy as a complete, four-limbed form, for an alternative
shot.
In almost every case, regarding photocomposition, I try
to crop my pictures so that the most important detail –
the one thing I most want my viewer to focus on (in this
case, SWEETIE’s eyes) – is about 1/3 of the way down
from the top edge of my shot.
Brightness / Contrast / Levels
If your photo session produces pictures too dark and muddy, or if there’s too little contrast between the darkest and the lightest tones in your photographs, use your photo editing software to adjust Brightness, Contrast, and/or Levels in your picture.
The particular software you use determines the tools you will find, but generally speaking, all photo editors contain at least one, if not all three, of these features.
Utilizing them can significantly lighten, brighten, and/or generally sharpen and bring out the textural elements in an otherwise unsatisfactory photo.
Play around with these features a bit. This is easy stuff, and the best part is that, if you make a mistake, you’re under no obligation to “save” your result and discard your original shot!
Color correcting
I try to avoid color correcting as I want the colors in my work to stand for themselves. But sometimes, no matter how careful my setup, my lighting is off, or my backdrop has unexpectedly cast strong, odd colors, or has sucked up all my efforts at good lighting and/or doesn’t bounce my light around well, and my pictures turn yellow, green, or blue in tone. Icky.
This is where your photo editor comes in great handy. With the simple movement of a lever here, or a bar there, you can change the Hue, Saturation or Color Balance of your photos so that they more closely resemble the real-life subjects of your photographs.
I sometimes actually hold my teddy right next to my monitor as I adjust colors, for the truest match.
Again, your particular photo editing software will determine which levers and bars you need to manipulate, but most all have this functionality, and I encourage you to explore it and use it to your
best advantage.
Styling Teddy
The world might be a brighter, better place if “Teddy Bear Stylist” was an actual, full time occupation. But it can be a part-time job, at least for the bear maker/photographer.
Put most simply… TAKE THE TIME to style your bear before his photo session.
He wants to look his very best! Brush out distracting snarls, smooth down stray wild hairs, polish eyes to sparkling, and pose your teddy in winsome, winning ways, both standing and sitting (if you can,) from left and from right sides, looking up and looking down, and maybe even looking over his shoulder.
Be sure your backdrop is lint-free, and keep a lint roller nearby to clean it up, just in case it isn’t.
If your bear is adorned with accessories or is wearing a collar, clear the hair from them so they can be better seen and fully appreciated.
Use an additional “hair light” for highlighting those accessories, particularly for sparkly accessories such as tiaras and jewelry, which can really “shine” with the extra illumination from such a light.
If your bear wears clothes, make sure they are ironed (if theyare the type that need ironing), and that they hang attractivelyand aren’t all bunched up - making their detailing and texture difficult to ascertain, or giving teddy the dreaded “wedgie.”
Ouch.
The Essence of Time
It takes an investment of time to prepare and style a teddybear for photography and to shoot a photo worthy of displayingyour hard work to its best advantage.
Plan to spend at least five to ten minutes in grooming and setup, plus 10-20 minutes shooting photos and re-positioning teddy all the while.
I generally take about 20-30 pictures per bear from many angles and include several variations each of full-body, three-quarter, and close-up shots.
Plan on another five to ten minutes to download and sort/rename your photos; thirty minutes to an hour to create an auction using them. If you want to resize, edit, correct, or optimize your photos for web use, or to post them to your website, allow an hour or more of additional time, depending upon the number of photos involved.
This bear photography thing is definitely not a quick and dirty proposition, and requires time and energy to do well.
Thankfully though, for the bear maker who hopes to sell, be published, or be competitive alongside so many talented peers, it’s a more than worthwhile endeavor.
Page 1 Page 2 Page 3 Page 4
|

 3428 Hillvale Road